Buca n°1 |
Buca n°2 |
Buca n°3 |
Buca n°4 |
Buca n°5
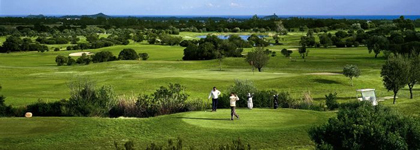
Is Molas Golf Club buca n°1
Par
| tee bianco | tee giallo | tee nero | tee rosso |
| 000 mt | 000 mt | 000 mt | 000 mt |
| 000 yd | 000 yd | 000 yd | 000 yd |
Questo par è abbastanza semplice e presenta un'entrata stretta al green ben difeso. Il drive va indirizzato tra
l'albero ed il bunker seguito da un secondo a scavalcare le quattro querce che possono essere agevolmente
superate.
Is Molas Golf Club buca n°2
Par 4
| tee bianco | tee giallo | tee nero | tee rosso |
| 000 mt | 000 mt | 000 mt | 000 mt |
| 000 yd | 000 yd | 000 yd | 000 yd |
Un par 4 con un bunker a sinistra. Il drive si presenta semplice, ma segue un secondo colpo
in salita alquanto arduo in cui bisogna piazzare il drive sulla destra. Il terzo colpo sarà così un ferro più corto per il green.
E' un green molto lungo con un ingresso strettissimo fra i bunkers.
Is Molas Golf Club buca n°3
Par 3
| tee bianco | tee giallo | tee nero | tee rosso |
| 000 mt | 000 mt | 000 mt | 000 mt |
| 000 yd | 000 yd | 000 yd | 000 yd |
Questo par 3 chiede un primo colpo diritto verso il green che risulta sopraelevato ed ampio senza
particolari pendenze. Un bunker a sinistra difende il green ed
un altro dietro ad esso protegge il tee successivo.
Is Molas Golf Club buca n°4
Par
| tee bianco | tee giallo | tee nero | tee rosso |
| 000 mt | 000 mt | 000 mt | 000 mt |
| 000 yd | 000 yd | 000 yd | 000 yd |
Questo par è un secco dog-leg. E' consigliabile un drive lungo ed alto "fade" scavalcando l'alberello
al vertice del dog-leg. Il secondo colpo sarà più semplice con un ferro per attaccare il green dal lato
meno difeso.
Is Molas Golf Club buca n°5
Par
| tee bianco | tee giallo | tee nero | tee rosso |
| 000 mt | 000 mt | 000 mt | 000 mt |
| 000 yd | 000 yd | 000 yd | 000 yd |
Questo par è la buca più punitiva di tutto il percorso: a destra ed a sinistra per tutta la sua
lunghezza i cespugli costeggiano il fairway, un lago e' in agguato per inghiottire il quick-hooks, inoltre
un bunker profondo sulla sinistra ed un albero a centro pista indicano la via che costituisce
l'approccio al green e nelle cui vicinanze scorre un rio nascosto.
Il green e' a due piani, di varie dimensioni e situato su uno spuntone di roccia. Necessita pertanto un colpo alto tagliando l'angolo col drive.